 | J & S Enterprises |  |
 | J & S Enterprises |  |

| 
| 
|
Choose Your Material
The plans are shown using ¾" material thickness throughout. You can take a couple
of approaches to the material widths you start with, this should depend on the
availability and cost, as well as your ability in joinery. A properly glued edge joint can
be as strong or stronger than the surrounding wood, but you must remember to use a
water proof glue. Ideally you should work with 8" and 4" widths, but the entire chair
can be constructed using narrower widths if you edge glue them for the wider parts. All dimensions are for full sized chairs, reduce to any size you want !
The plans will assume ideal widths, using the following lengths of each width…
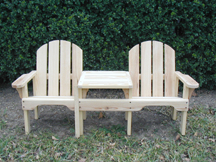
To assemble the chair, start by screwing the bottom back support to the side boards in the 2 ¾ " angled notches (flush to the side faces), square to 90 degrees and tightening the screws to the sides. Now screw the front seat slat in place making sure it is also square and flush to the side boards. Next, place the rest of the seat slats equally spaced in between the bottom back support and the front seat slat, and screw in place using one screw per side. Leave the last seat slat off, so that the back slats can be easily screwed on.
Next, place the rear struts up to the back of the bottom back support and on the inside of the side boards and just touching the bottom back support and with the angled end down and flush with the bottom of the sides, as per the drawings. Then screw in place being sure the back struts are flush with the bottom of the side boards.
The top back support can now be screwed to the top of the rear struts, then the back slats can be screwed to the bottom back support, being sure to separate them evenly. If you screw the outer slats first, then the center slat and so on, it will be easy to space them evenly. Once the bottom of the back slats are screwed in place then the tops can be adjusted for position and screwed to the top back support ,evenly spaced as with the bottoms of the back slats. You will have to chamfer the outer back slats a little with a chisel when screwing the back seat slat in place.
The front legs can be mounted next, clamp them 5" back from the front seat slat, as per the drawings. Place the chair on a flat surface and lift the front up so that the back angle of the side boards is flat on the surface before screwing the front legs in place. Screw the small braces together and then mount them on top of the front legs. Next clamp the arms on top of the front leg braces with the back against the rear back struts as per the drawings, hold the back of the arms up and level and then screw onto the back struts. Remove the clamps and position the arms so that they are about 1" in from the leg and arm braces and screw into position.
The cross brace ties in the sides and back struts and should be the last part to screw in place after all the other parts are mounted, glued and tightened.
Now the most important step, grab your favorite icy beverage, sit back, and enjoy the relaxing fruits of your labors !
